How to: Create a boost campaign alongside your Labelizer Strategy

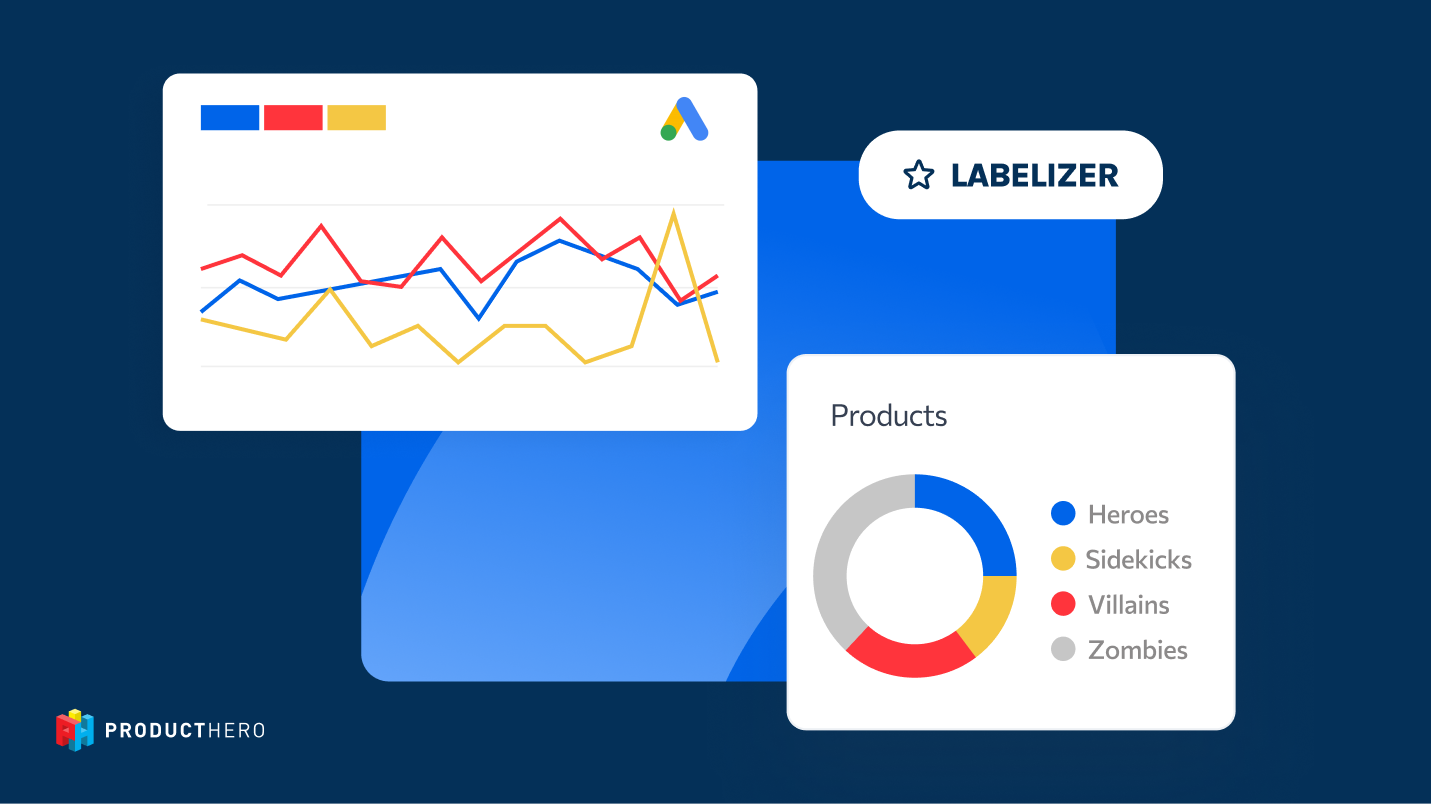
This guide explains how to create a boost campaign for specific products (such as sale items, new arrivals or seasonal items) when using the Labelizer setup. If you’re new to the Labelizer Strategy, we recommend reading this Labelizer article first, so you understand how Hero, Sidekick, Zombie and Villain labels work and how they are used to segment your products.
Which products belong in a boost campaign?
A boost campaign is a special campaign you create to promote a specific group of products which you want to prioritise for a short time. These might be new products that haven’t gained traction yet, seasonal or holiday items, or older inventory that is on sale. Instead of grouping these products together with your standard Labelizer-managed assortment, a boost campaign allows you to promote them separately with their own bidding strategy.
For example, imagine a retailer called Heroshop transitioning from its winter to spring collection. The remaining winter items are discounted. To avoid these sale items interfering with regular Labelizer performance thresholds, Heroshop chooses to move them out of the existing Labelizer structure and into a dedicated boost campaign.
Step 1: Tag the products you want to boost
To begin, you need to identify the products that belong in your boost campaign.
In the Producthero Platform, manual tagging allows you to tag products that deserve special handling. Once you’ve created the appropriate tag (for instance, “Sale”), assign it to an empty custom label. In our example, Heroshop tags all winter sale items as “Sale” and assigns this tag to Custom Label 1.
For a step-by-step guide on manual product tagging, please refer to our Help Guide.
Step 2: Create a Boost Campaign in Google Ads
Once your tags are visible in Merchant Center and Google Ads, you can move on to creating your Boost Campaign in Google Ads.
The tags will not override the current Labelizer labels, so you’ll need to manually exclude the Sale products from the listing group of your existing Heroes, Sidekicks, Villains and Zombies campaigns as explained in detail below.
Below is an example setup based on the Heroshop account:
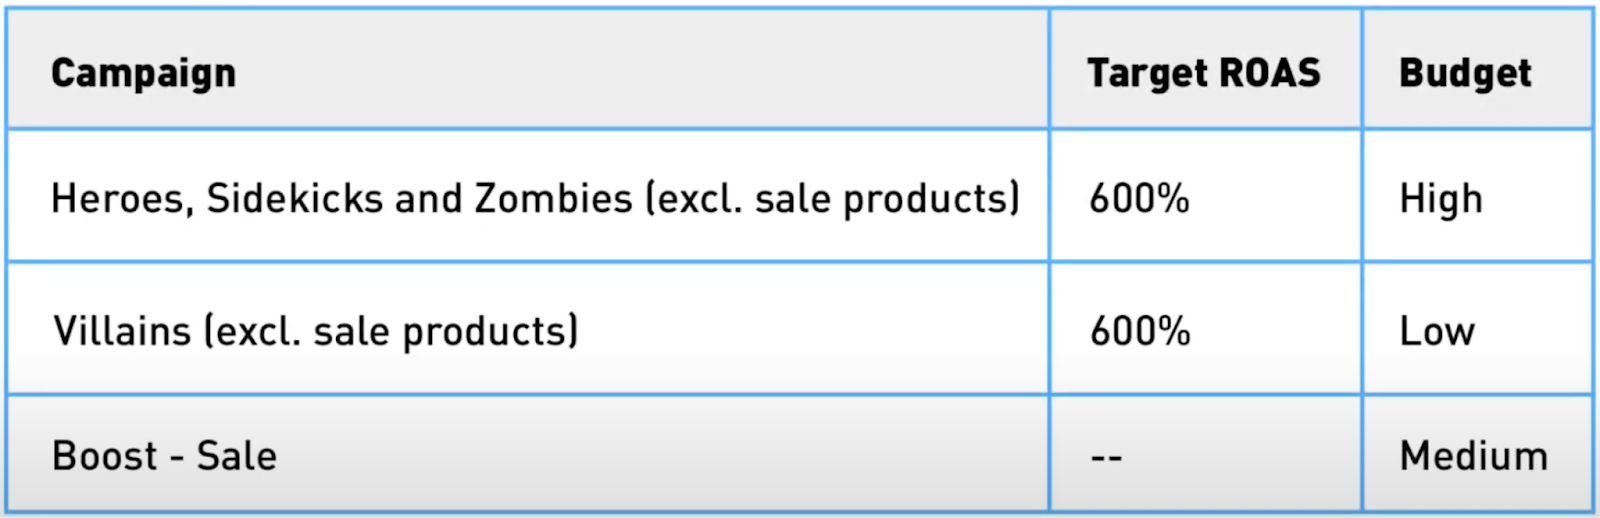
After reviewing the five Labelizer strategies outlined in this guide, Heroshop chose to focus on profitability. To support this approach, they organized their structure into three campaigns, giving villains their own dedicated campaign. The first campaign groups Heroes, Sidekicks, and Zombies together, while the second campaign is exclusively for Villains. Following Labelizer best practices, both campaigns use the same Target ROAS.
Sale products are managed in a separate Performance Max campaign. For this sale campaign, Heroshop decided not to set a Target ROAS. Leaving the ROAS open gives Google’s algorithm more flexibility to drive conversions and increase visibility for discounted items without being restricted by strict profitability goals. This is a strategic choice, and performance should be monitored closely. If you need help determining the right Target ROAS for your business, you can refer to this blog article.
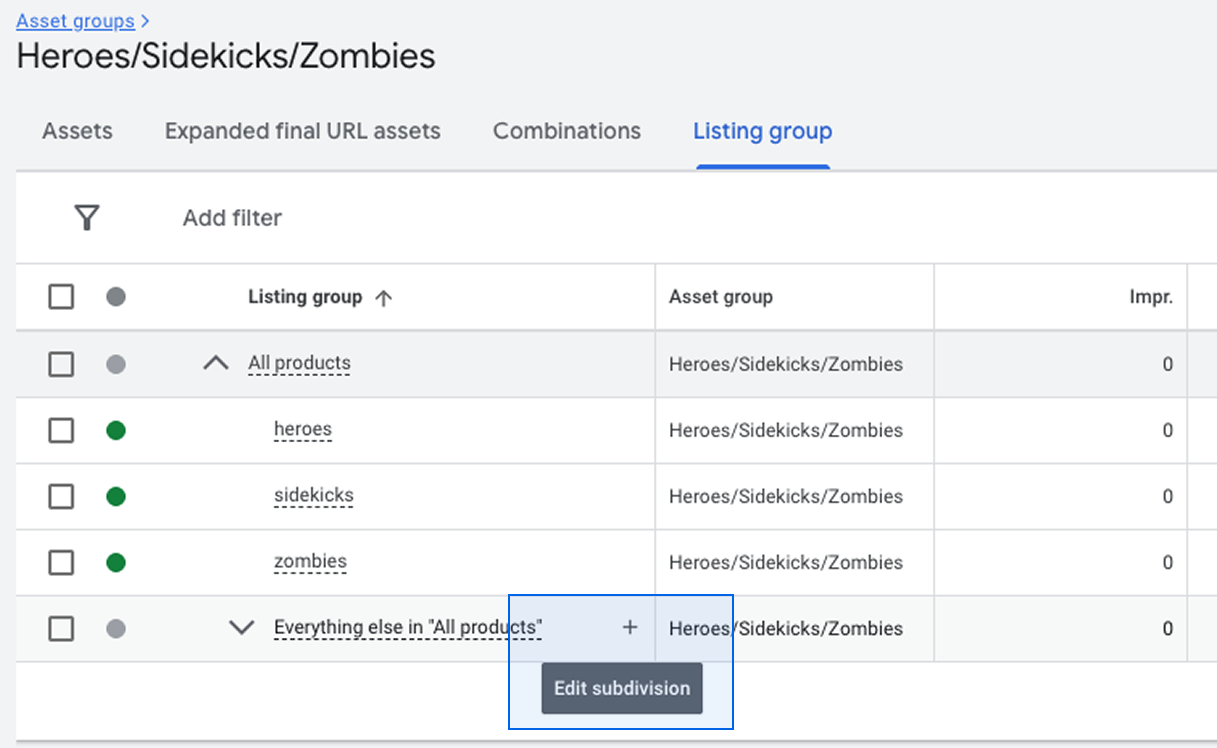
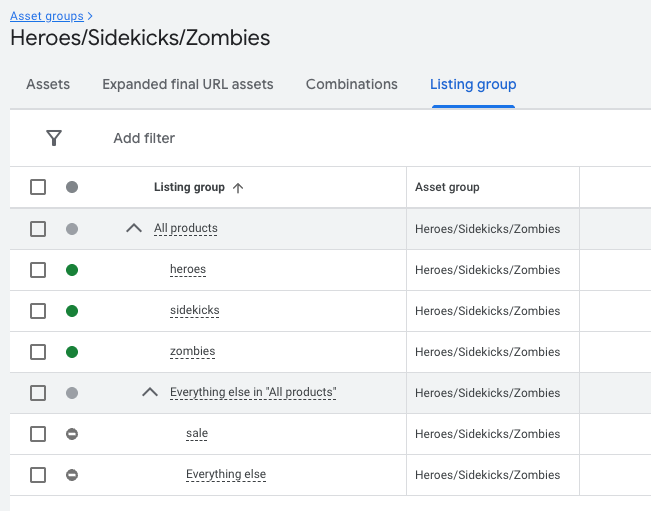
Campaign one (Heroes, Sidekicks and Zombies)
This campaign includes all Heroes, Sidekicks, and Zombies products. To do so, Villains and Sale products should be excluded from this campaign.
In this example setup:
- Labelizer labels are stored in Custom Label 0
- Sale products are stored in Custom Label 1
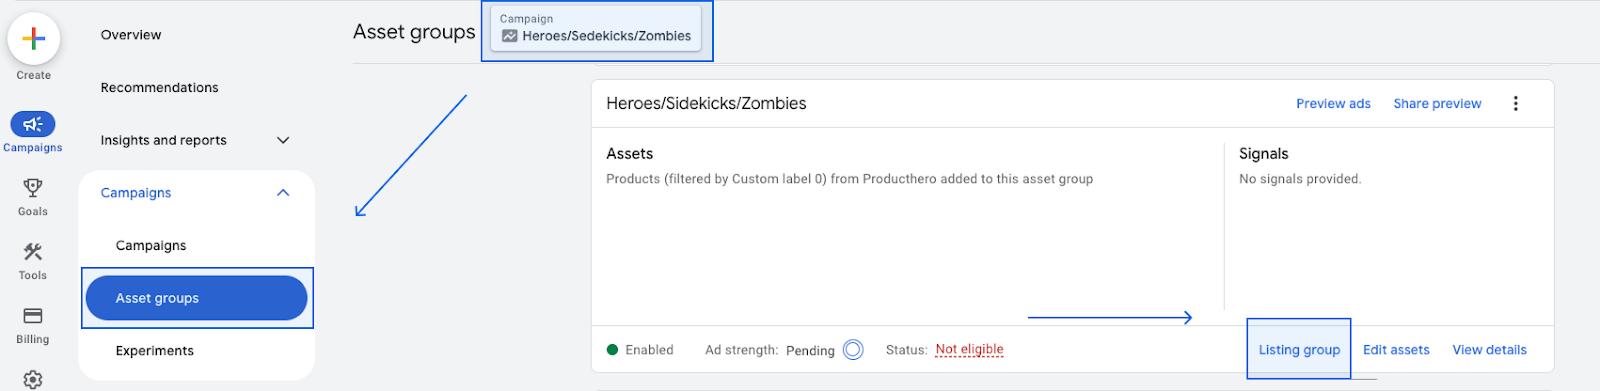
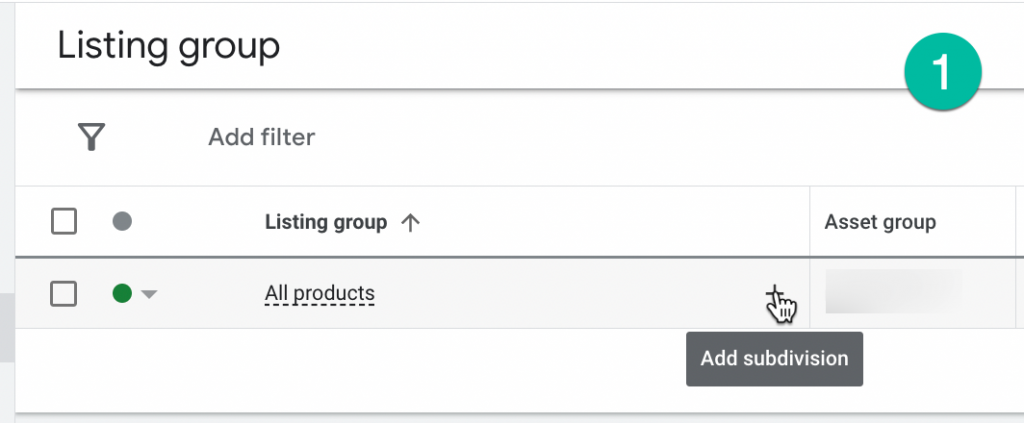
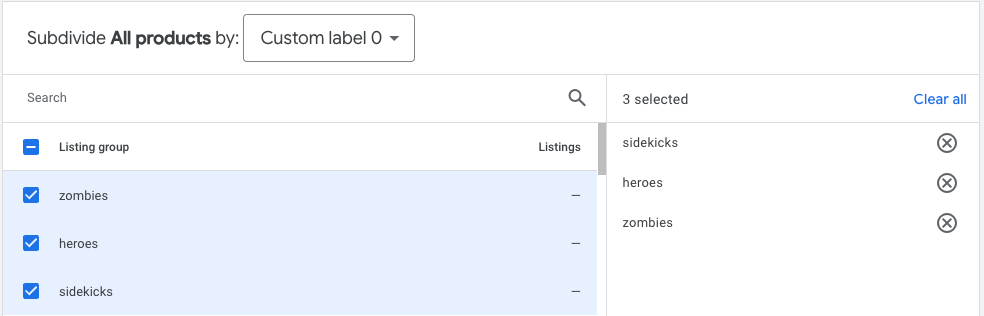
1. Inside the campaign’s Listing Groups, open the All Products section
2. Add the Heroes, Sidekicks and Zombies by selecting Custom Label 0.
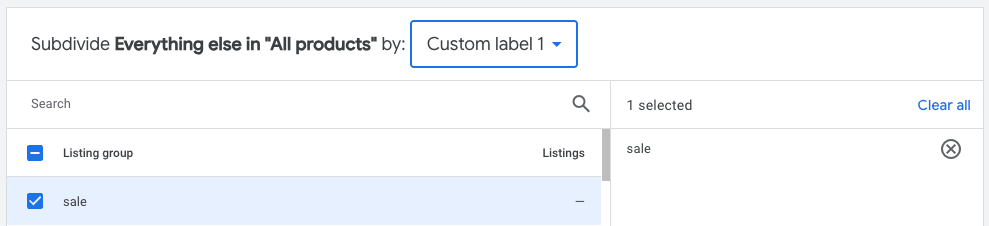
3. From here we need to exclude the Sale products. Click on the + icon next to Everything else in “All products”.
4. Select Custom Label 1 and click on Sale.
5. The Sale products are now included in the Listing Group, however, we want to exclude them. So, click on the green dot and click on exclude
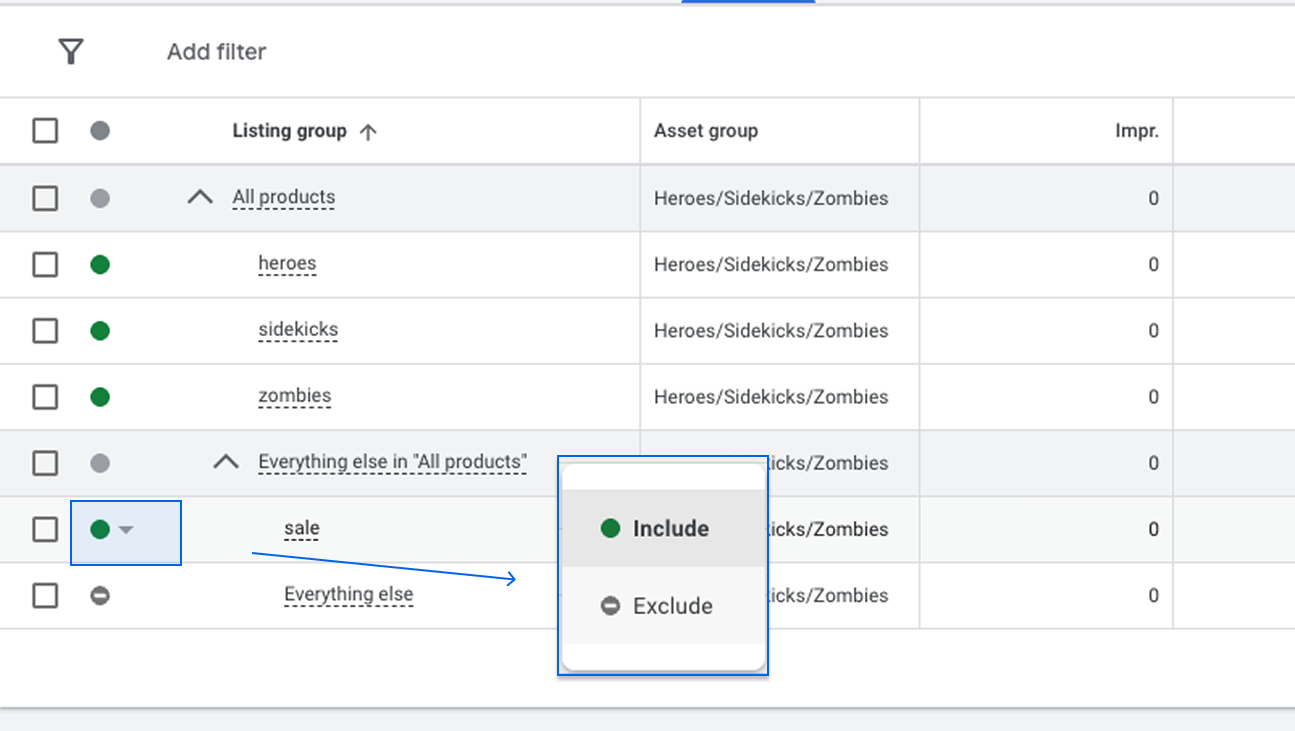
6. That’s it! The Listing Group of the first campaign containing all products except Villains & Sale looks like this:
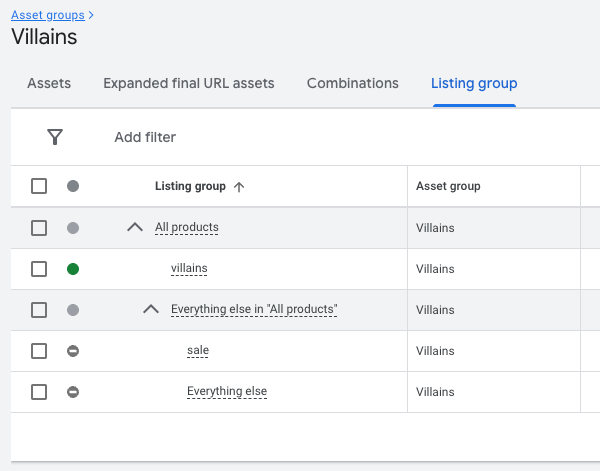
Campaign 2: the Villain campaign
Apply the same logic to campaign 2 (including villains only and excluding sale products). The listing group will look as follows:
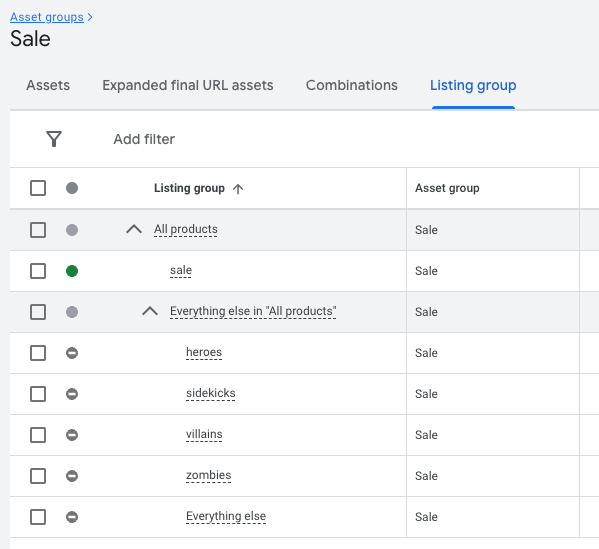
Campaign 3: the (sale) boost campaign
Next, repeat the process by creating a subdivision to include all Labelizer labels. Since you only want to target sale products, exclude all Labelizer labels from the listing group filters. Your listing group will now look like this:
Achieve great results with the Labelizer Strategy
Selecting the right campaign structure can be challenging, but the Labelizer Strategy has proven to be a reliable approach for many retailers. By grouping products based on real performance, it creates a clearer setup that supports better budgeting and smarter optimization decisions.
One bathroom-furniture retailer, for example, recorded 61% revenue growth in the category where they applied the Labelizer Strategy.
Read the full case study to learn how they implemented it and what contributed to their results.
Our articles and case studies
.png)
Introducing Manual Tagging: Create and manage custom tags that fit your campaign strategy.
.png)